
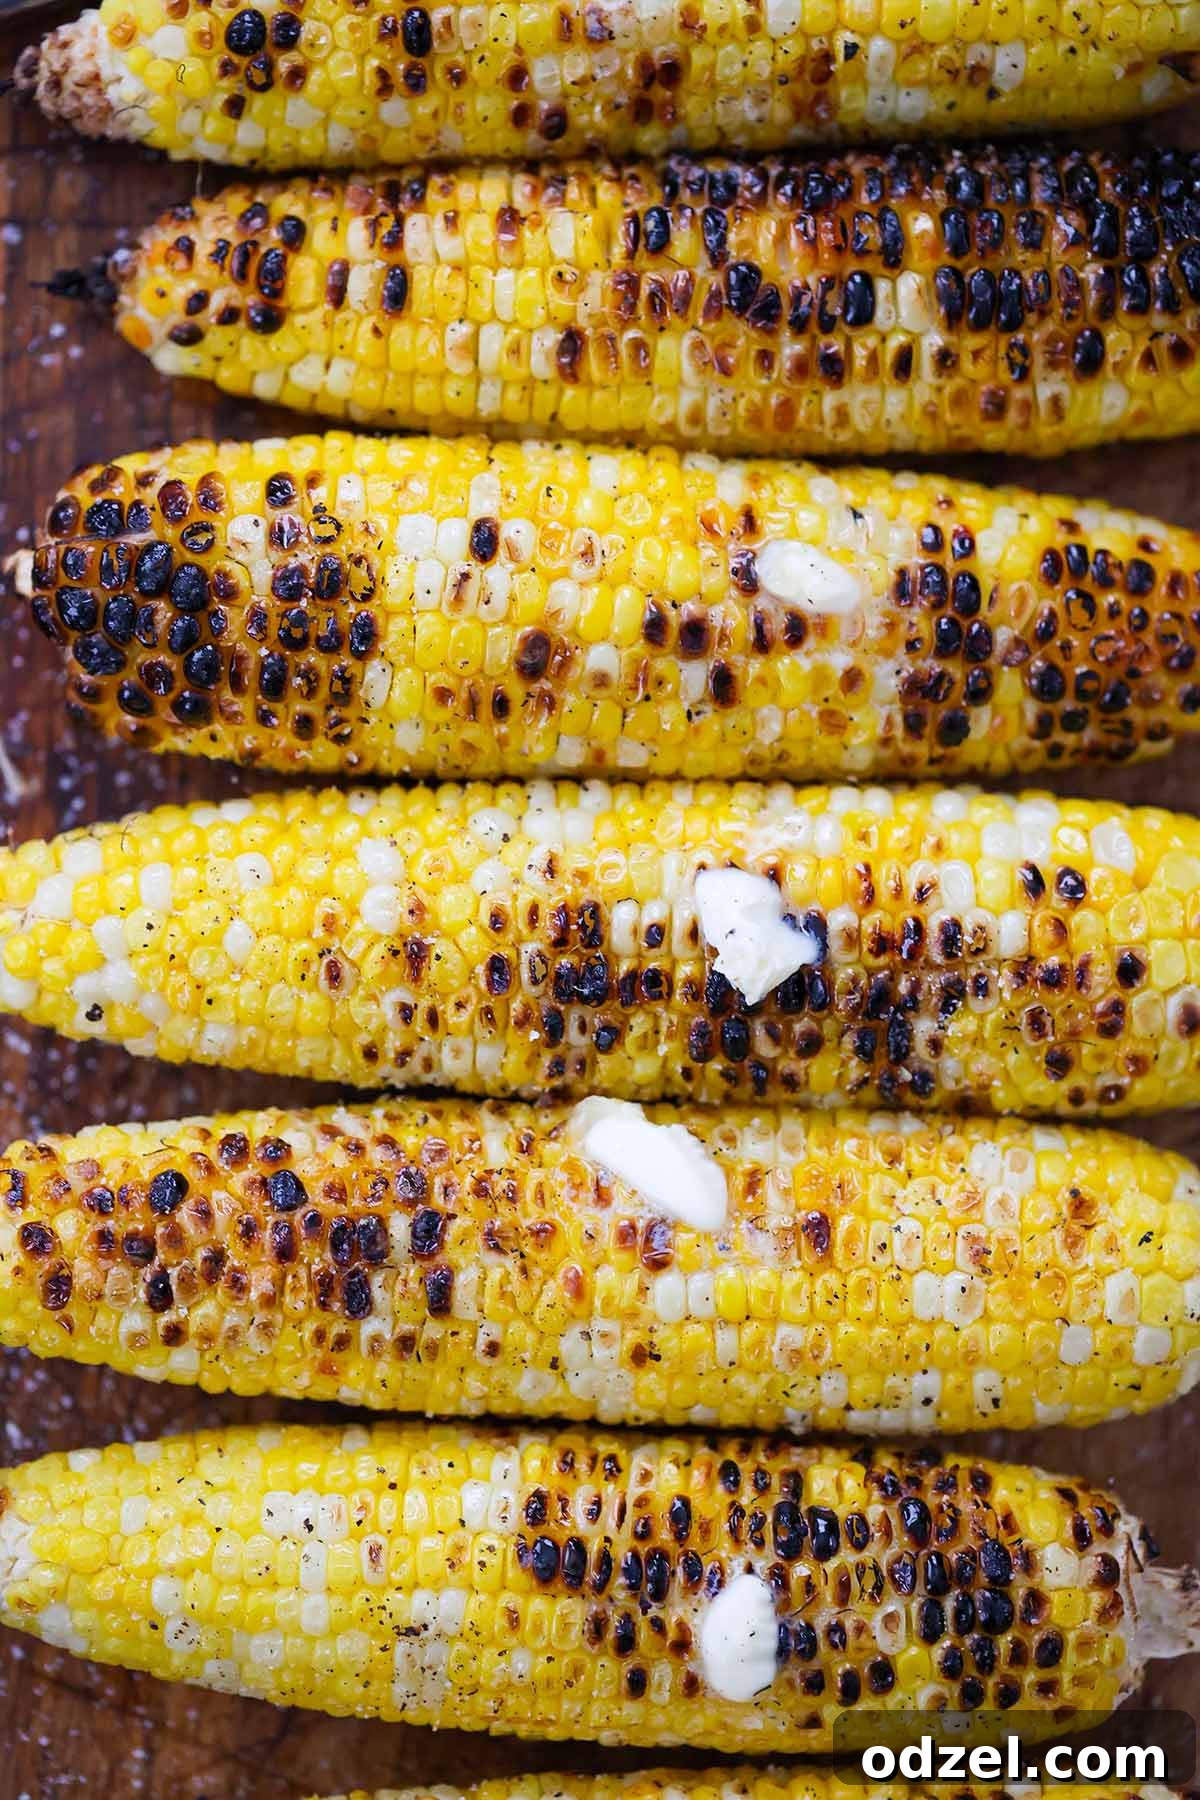
There’s nothing quite like the sweet, smoky char of perfectly grilled corn on the cob to elevate any meal, especially during warm weather gatherings. This recipe brings you just that – a simple yet incredibly flavorful side dish that’s guaranteed to be a hit at your next barbecue, picnic, or family dinner. With minimal ingredients and straightforward steps, you can achieve corn cobs that are tender on the inside with beautifully caramelized kernels on the outside, bursting with a savory-sweet essence. Forget boiling or steaming; grilling unlocks an unparalleled depth of flavor that’s both comforting and exciting. Whether you’re a grilling novice or a seasoned pitmaster, this charred corn on the cob recipe is designed for effortless success, promising a delightful addition to your culinary repertoire.
If you’re a true corn enthusiast, we encourage you to explore other delightful recipes that highlight this versatile vegetable. Don’t miss out on our rich and creamy hot cheesy corn dip, the bold and zesty Cajun fried corn, and the refreshing creamy corn salad. Each offers a unique way to enjoy corn, transforming it into an unforgettable dish.
WHY YOU’LL LOVE THIS CHARRED CORN ON THE COB RECIPE
This charred corn on the cob isn’t just another side dish; it’s a culinary experience waiting to happen. Here’s why it deserves a permanent spot in your recipe collection:
- **Effortless Preparation, Incredible Flavor:** You don’t need to be a gourmet chef to master this recipe. The beauty lies in its simplicity. Just a few basic ingredients and a hot grill (or even your stovetop) are all it takes to create corn cobs that are sweet, smoky, and irresistibly delicious. The charring process brings out the natural sweetness of the corn, adding a complex layer of smoky flavor that boiled corn simply can’t match.
- **No Outdoor Grill? No Problem!** One of the standout features of this recipe is its adaptability. While an outdoor grill delivers fantastic results, you can achieve that desirable char and flavor using a grill pan or even directly on your stovetop grates. This makes it a perfect dish to enjoy year-round, regardless of the weather or your living situation. Apartment dwellers and those without a backyard can still savor grilled corn perfection.
- **Minimal Ingredients, Maximum Taste:** All you need are fresh corn, a touch of butter, and a sprinkle of salt and pepper. These humble ingredients combine to create a symphony of flavors. The butter melts into the warm kernels, enhancing their creamy texture, while the salt and pepper provide the perfect balance, making every bite a delight. This focus on high-quality, fresh ingredients ensures a naturally delicious outcome.
- **Quick and Convenient:** In just 15-20 minutes of cooking time on the grill, you can transform raw corn into a golden, charred masterpiece. This makes it an ideal last-minute side dish for busy weeknights or when you need something quick and impressive for unexpected guests. The prep time is minimal, allowing you to focus on other aspects of your meal.
- **Perfect for Any Gathering:** Whether you’re hosting an intimate family dinner or a large backyard cookout, this charred corn is incredibly easy to scale up. Simply buy more ears of corn to feed a crowd, and the cooking process remains just as straightforward. Its universal appeal means it will be a crowd-pleaser, satisfying both adults and children alike. It’s the quintessential summer side that everyone expects and loves.
INGREDIENT NOTES FOR PERFECT CHARRED CORN
Achieving the best charred corn on the cob starts with selecting high-quality ingredients. While this recipe is incredibly simple, paying attention to these details will make a significant difference in the final taste and texture.
- Fresh Corn: The star of the show! You’ll need about 6 ears of fresh corn for a standard serving. When selecting corn, look for bright green husks that are tightly wrapped. The silk should be slightly damp and golden or brown. Avoid corn with dry husks or silk, as this can indicate older corn. Gently peel back a small portion of the husk to check that the kernels are plump and extend all the way to the tip. Once you’re ready to cook, thoroughly remove the husks and all the silky strands from each ear.
- Unsalted Butter: Softened at room temperature, unsalted butter spreads effortlessly onto the warm corn, infusing it with a rich, creamy flavor. Using unsalted butter allows you to control the total amount of salt in the dish. If you prefer, melted butter can also be used, making it even easier to brush onto the hot cobs. The butter is crucial for flavor and helps the seasoning adhere.
- Kosher Salt and Freshly Cracked Black Pepper: These humble seasonings are essential for enhancing the corn’s natural sweetness and smoky notes. Kosher salt, with its larger flakes, provides a pleasant texture and distributes flavor evenly. Freshly cracked black pepper adds a subtle kick and aromatic depth that complements the char. Season generously to taste once the corn comes off the grill – this is when it truly absorbs the flavors.
- Cooking Oil: A small amount of high-smoke-point oil (like vegetable, canola, or grapeseed oil) is key for greasing your grill grates or grill pan. This prevents the corn from sticking and helps create that beautiful, even char without burning. Just a light brush is all that’s needed to ensure a smooth cooking process.
PREPARING YOUR CORN FOR THE GRILL
Proper preparation ensures your corn cooks evenly and achieves that perfect char. Follow these simple steps before you even think about hitting the grill:
- **Husk and De-Silk:** Start by removing the outer husks from each ear of corn. Peel them back completely and then carefully remove all the fine silky strands. A stiff brush or even a damp paper towel can help you get rid of stubborn silks. The cleaner the corn, the better the char will be on the kernels.
- **Rinse and Pat Dry:** Give the husked corn a quick rinse under cool water to remove any remaining debris. Then, pat each cob thoroughly dry with a paper towel. Excess moisture can hinder the charring process and cause the corn to steam rather than grill.
- **Prepare Your Grilling Surface:** Whether you’re using an outdoor grill or a stovetop grill pan, preheat it to medium-high heat. Once hot, lightly brush the grates with a small amount of cooking oil. This essential step prevents the corn from sticking and ensures easy flipping, leading to an even char across all sides.
STEP-BY-STEP GUIDE TO GRILLED CORN PERFECTION
Grilling corn on the cob to achieve that delightful char is simple and quick. Follow these instructions for a perfectly sweet and smoky result every time:
- **Preheat and Oil Your Grill:** Begin by preheating your outdoor grill or stovetop grill pan to medium-high heat. This ensures the cooking surface is hot enough to create a good char. Once heated, lightly brush the grill grates with a high-smoke-point oil (such as vegetable, canola, or grapeseed oil) to prevent the corn from sticking.
- **Place Corn on the Grill:** Carefully place the husked and de-silked corn cobs directly onto the preheated and oiled grill. Arrange them in a single layer, leaving a little space between each cob for even cooking.
- **Grill and Turn for Even Charring:** Cook the corn for a total of 15-20 minutes, turning it occasionally with tongs. The goal is to achieve a beautiful char on all sides, indicating that the natural sugars have caramelized and developed a smoky flavor. Look for golden-brown spots and blackened areas on the kernels. Don’t be afraid of a little char; that’s where much of the flavor comes from! Continue rotating until all sides have been exposed to the heat and have developed your desired level of char.
- **Remove, Butter, and Season:** Once the corn is cooked to perfection and has a lovely char, carefully remove it from the grill using tongs. Immediately transfer the hot cobs to a serving platter. While still hot, brush each ear generously with softened unsalted butter. The heat of the corn will quickly melt the butter, allowing it to coat every kernel. Finish by sprinkling liberally with Kosher salt and freshly cracked black pepper to taste. The seasonings will adhere beautifully to the melted butter.
- **Serve Immediately:** Charred corn on the cob is best enjoyed fresh off the grill. Serve it warm and watch it disappear!
TOP TIPS FOR THE BEST CHARRED CORN
While the recipe is straightforward, a few expert tips can elevate your charred corn from good to absolutely phenomenal:
- **Don’t Skimp on the Grease:** Always make sure to lightly grease your grill grates or grill pan with oil before placing the corn. This crucial step prevents the corn from sticking, making it easier to turn and ensuring a clean, even char without tearing the kernels.
- **Season While Hot:** The moment the corn comes off the grill, it’s essential to brush it with softened butter and season generously with salt and pepper. The heat of the corn will melt the butter perfectly, allowing the seasonings to adhere and be absorbed, maximizing flavor in every bite.
- **Embrace the Char:** Don’t be afraid of those slightly blackened kernels. The char is where the magic happens, developing deep, smoky, and caramelized flavors that are the hallmark of this dish. Aim for visible grill marks and some dark spots for optimal taste.
- **Utilize Your Stovetop:** If an outdoor grill isn’t an option, a heavy-bottomed cast iron grill pan or even direct contact with your stovetop grates (if safe and appropriate for your range) can create a fantastic char. Ensure good ventilation when cooking indoors.
- **Choose Fresh Corn:** The fresher the corn, the sweeter and more tender it will be. Look for plump, firm kernels and bright green husks for the best results. Peak season corn will deliver the most flavor.
- **Don’t Overcrowd the Grill:** Cook the corn in batches if necessary to avoid overcrowding the grill. Giving each cob enough space ensures consistent heat distribution and allows for proper charring rather than steaming.
FREQUENTLY ASKED QUESTIONS ABOUT CHARRED CORN
HOW LONG DO I COOK THE CORN FOR?
The ideal cooking time for charred corn on the cob is typically between 15-20 minutes on medium-high heat. During this time, you should turn the cobs occasionally using tongs to ensure all sides get an even exposure to the heat. You’re looking for kernels to become tender, with noticeable golden-brown to slightly blackened char marks. The exact time can vary depending on your grill’s heat intensity and the size of the corn, so visual cues are key: tender kernels and appealing charring.
DO I HAVE TO SOAK THE CORN IN WATER BEFORE GRILLING?
No, you do not need to soak the corn in water for this recipe. Soaking corn in water is primarily done when you intend to grill it with the husks still on. The husks act as a protective layer, and soaking prevents them from burning while allowing the corn to steam within. Since this recipe calls for removing both the husks and silk before grilling, direct charring on the kernels is the goal, and no soaking is necessary. In fact, wet corn might steam rather than char effectively, so ensure your corn is patted dry before it hits the hot grates.
CAN I ADD OTHER SEASONINGS OR FLAVORS?
Absolutely! While classic butter, salt, and pepper are delicious, feel free to experiment. You can try a squeeze of fresh lime juice, a sprinkle of chili powder or smoked paprika for a smoky-spicy kick, a dash of garlic powder, or even fresh chopped herbs like cilantro or parsley. A dusting of Parmesan cheese or a drizzle of spicy mayo after grilling also works wonders. The possibilities are endless for customizing your charred corn!
HOW DO I KNOW WHEN THE CORN IS DONE?
The corn is done when the kernels are tender and have developed significant char marks on most sides. You can test for tenderness by gently pressing a kernel with a fork or by taking a small bite from a less charred area (be careful, it will be hot!). The kernels should be plump and sweet, not hard or starchy. The charring is a visual indicator of flavor development rather than just doneness.
WHAT CAN I SERVE THIS CHARRED CORN WITH?
Charred corn on the cob is an incredibly versatile side dish that complements a wide array of meals. Its sweet, smoky flavor pairs beautifully with classic barbecue fare and many other savory dishes. Here are some of our favorite pairings:
- **Air Fryer Chicken Kebabs:** The tender, seasoned chicken and vibrant vegetables on a skewer find a perfect partner in the smoky sweetness of charred corn. It creates a balanced and satisfying meal.
- **Hearty Baked Beans:** The rich, savory, and often sweet flavors of baked beans are wonderfully balanced by the fresh, crisp bite and smoky notes of grilled corn. This pairing is a staple at any cookout.
- **Creamy Coleslaw:** The cool, creamy, and slightly tangy crunch of coleslaw provides a refreshing contrast to the warm, charred corn. It’s a classic combination that brightens up any plate.
- **BBQ Grilled Shrimp:** The succulent, sweet notes of grilled shrimp coated in tangy BBQ sauce are exquisitely complemented by the smoky char of the corn. It’s a light yet flavorful pairing that screams summer.
- **BBQ Pulled Chicken Sandwiches:** A robust, saucy pulled chicken sandwich finds its perfect match in charred corn, offering a fresh, contrasting texture and flavor that cuts through the richness of the sandwich.
- **Grilled Steaks or Burgers:** Nothing beats charred corn alongside a perfectly grilled steak or a juicy burger. The smoky flavors echo each other, creating a cohesive and satisfying main course.
- **Fish Tacos:** For a lighter meal, charred corn adds a delightful texture and sweet element to fresh fish tacos, especially with a squeeze of lime.
- **Roasted Chicken:** A simple roasted or rotisserie chicken can be elevated with this flavorful side, adding a touch of summer flair to a comforting meal.
STORAGE AND LEFTOVERS
If you happen to have any leftover charred corn (which is rare!), it stores wonderfully for enjoying later. Place the cooled corn cobs in an airtight container and refrigerate them for up to 3-4 days. To reheat, you can grill them again briefly, warm them in a microwave, or even slice the kernels off the cob and gently sauté them in a pan with a little butter. Leftover kernels are also fantastic added to salads, salsas, or frittatas, giving new life to your meal prep.
We hope you enjoy this simple yet spectacular charred corn on the cob recipe! We love hearing from you. Don’t forget to connect with us on Facebook and Pinterest for more delicious recipes and cooking inspiration.
Charred Corn
Julie Maestre
10 mins
15 mins
25 mins
6
Print Recipe
Ingredients
- 6 ears of fresh corn, husks and silk removed
- ¼ cup unsalted butter , softened at room temperature (or melted)
- Kosher salt and freshly cracked black pepper , to taste
- cooking oil, for greasing the grill
Instructions
-
Preheat your grill (outdoor or stovetop grill pan) to medium-high heat and grease it lightly with oil to prevent sticking.
-
Place the husked and de-silked corn cobs directly on the hot grill. Cook for 15-20 minutes, turning occasionally with tongs to achieve an even char and tenderness on all sides.
-
Remove the corn from the grill. Immediately brush generously with softened butter, then season all over with Kosher salt and freshly cracked black pepper. Serve warm and enjoy!
Notes
- Make sure to grease the grill with some oil so the corn doesn’t stick.
- Brush with softened butter and season immediately after taking the corn off the grill, while it’s still hot.
- If you don’t have an outdoor grill, use a grill pan over your stovetop or cook the corn directly on your stovetop grates for a similar char.
Nutrition (Approximate per serving)
Calories: 69kcal | Carbohydrates: 0.2g | Protein: 0.1g | Fat: 8g | Saturated Fat: 5g | Polyunsaturated Fat: 0.3g | Monounsaturated Fat: 2g | Trans Fat: 0.3g | Cholesterol: 20mg | Sodium: 1mg | Potassium: 4mg | Fiber: 0.02g | Sugar: 0.1g | Vitamin A: 239IU | Vitamin C: 0.1mg | Calcium: 2mg | Iron: 0.01mg
Nutrition information is automatically calculated, so should only be used as an approximation.
Additional Info
Julie Maestre
10 minutes
15 minutes
25 minutes
Side Dish
American
6
69
charred corn, charred corn on the cob, grilled corn, easy corn recipe, BBQ side dish