
Easy Nutter Butter Mummies: The Ultimate 3-Ingredient Halloween Treat
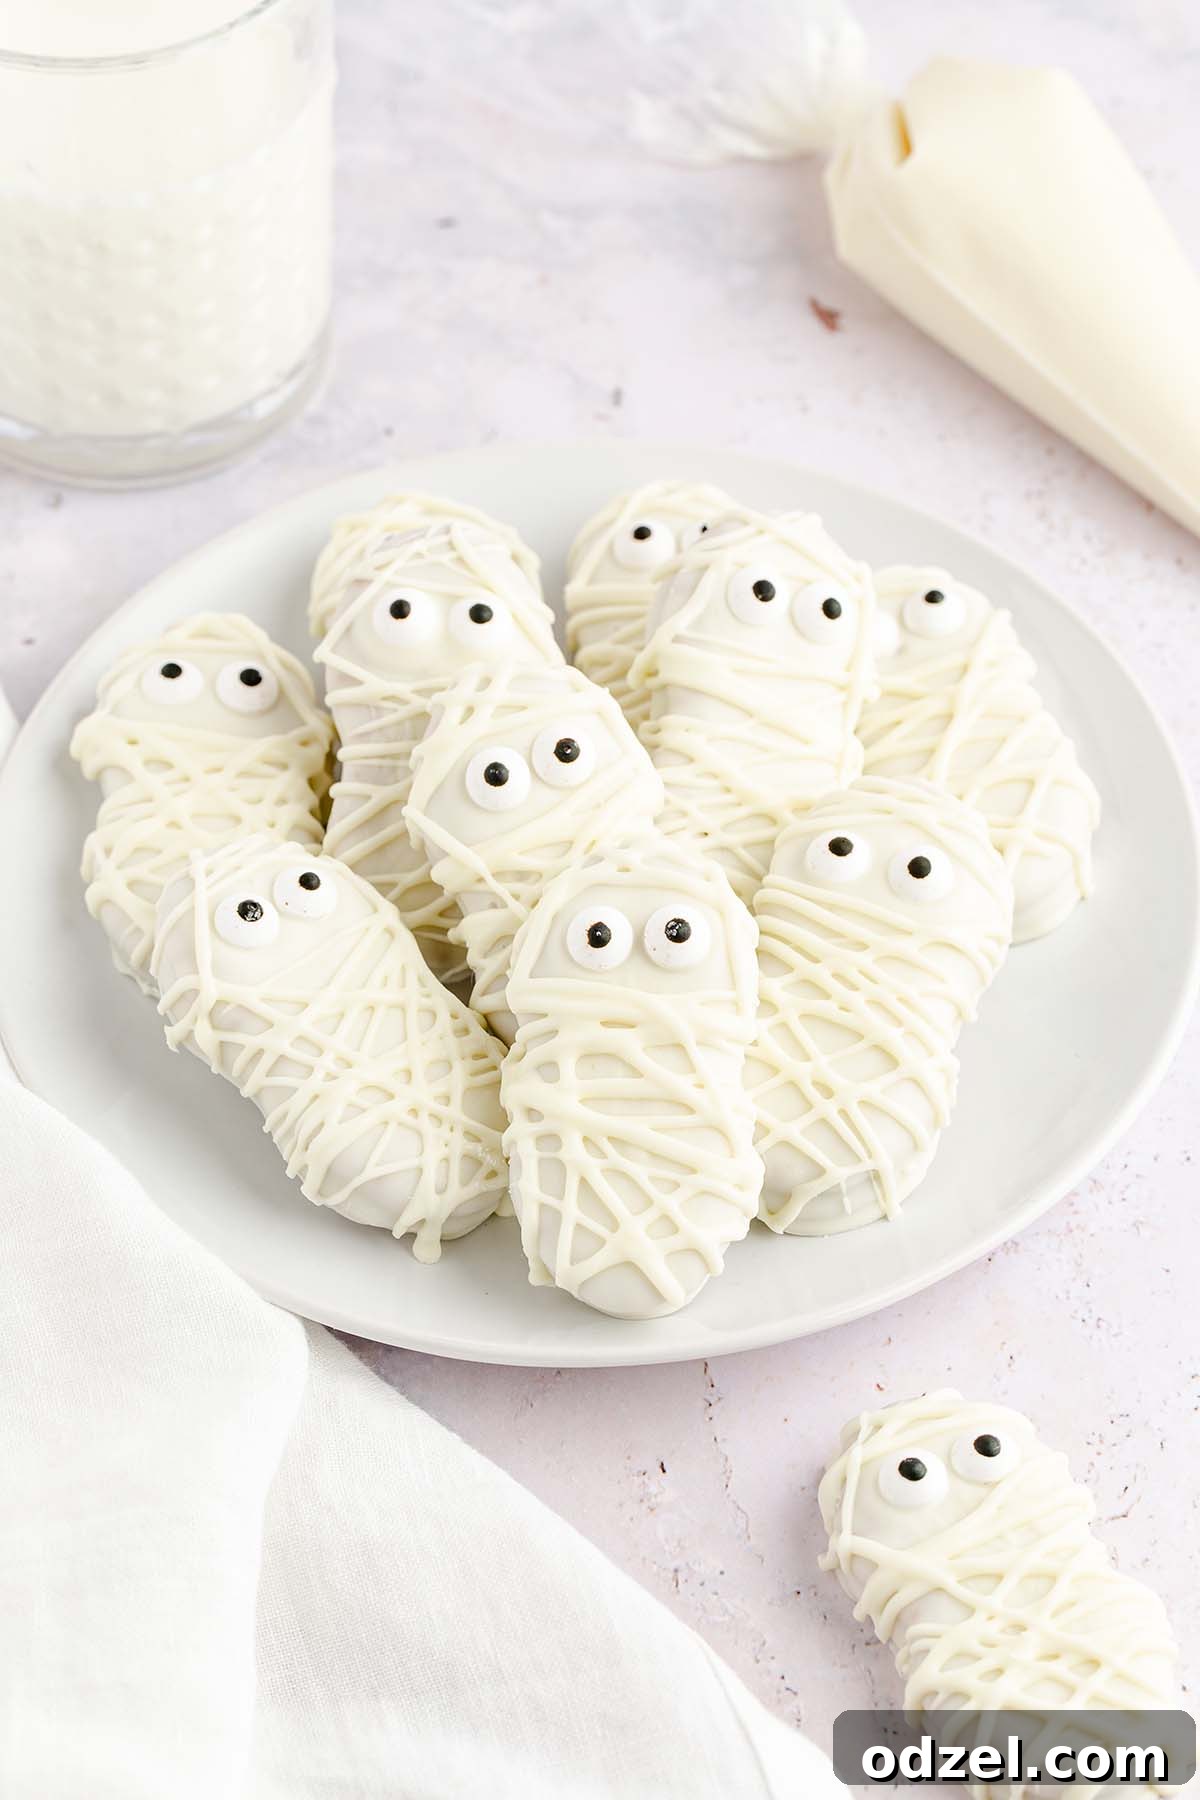
Get ready to whip up the cutest and spookiest Halloween treats with this incredibly simple recipe for Nutter Butter Mummies! Made with just three essential ingredients, these delightful white chocolate-dipped Nutter Butter cookies are adorned with whimsical candy eyes and a festive chocolate drizzle, making them an absolute must-have for any Halloween celebration. Whether you’re a seasoned baker or a complete novice, these no-bake cookies are designed for effortless fun and delicious results.
Halloween is a time for creativity, playful scares, and, most importantly, delicious treats! While intricate desserts can be exciting, sometimes you need a quick, reliable, and utterly charming option that everyone will love. These Nutter Butter Mummies fit the bill perfectly. They’re not only super easy to assemble but also offer a fantastic opportunity for kids to get involved in the kitchen, turning snack time into a fun, spooky craft session. Imagine trays filled with these adorable mummies at your next Halloween party – they’re guaranteed to be a hit!
Why You’ll Love This Easy Halloween Recipe
- Effortlessly Simple: With only three main ingredients and no baking required, these mummy cookies are incredibly straightforward to make. Perfect for busy schedules or spontaneous Halloween fun.
- Kid-Friendly Fun: Little hands will love dipping cookies and adding candy eyes, making this a fantastic activity for the whole family.
- Party Perfect: These charming treats are ideal for Halloween parties, school events, or even just a fun snack at home. They’re visually appealing and universally loved.
- Quick & Convenient: From start to finish, you can have a batch of these spooky delights ready in under 30 minutes, including setting time.
- Customizable: Easily adapt with different cookies, chocolate types, or additional decorations to suit your taste and theme.
Following the success of other festive creations like my Jack-O-Lantern pumpkin cupcakes, I was inspired to create another accessible and fun Halloween recipe. My nieces and nephews adore helping out, and these Nutter Butter Mummies proved to be a delightful project for everyone. If you’re hosting a Halloween gathering this year, these cookies are truly a must-have addition to your spooky spread!
Essential Ingredients for Your Nutter Butter Mummies
The beauty of this recipe lies in its simplicity. You only need a few key items to create these adorable mummy cookies. Here’s a closer look at what you’ll need and some helpful tips for each.
- White Chocolate: I typically use high-quality vanilla-flavored white chocolate bars or chips for a rich, smooth finish. However, feel free to use white candy melts for an even easier experience. Candy melts often set faster and provide a vibrant white color without tempering. Ensure you have enough, as you’ll be dipping all your cookies generously!
- Nutter Butter Cookies: These classic peanut butter sandwich cookies are the star of our show. Their unique shape is perfect for transforming into mummy figures. It is absolutely crucial to be mindful of peanut allergies when serving these cookies. Always advise guests or family members about the peanut butter content to ensure everyone’s safety.
- Candy Eyes: These delightful edible eyes bring our mummies to life! You can easily find candy eyes online, in most grocery stores during the Halloween season, or at specialty craft and baking stores. If you’re struggling to find them or prefer a homemade touch, you can use decorating icing with a fine tip to pipe small white circles with a dark dot in the center. Mini dark chocolate chips can also be pressed onto the chocolate before it sets for a similar effect.
Mastering Your Nutter Butter Mummies: Expert Tips and Tricks
While this recipe is incredibly easy, a few expert tips can ensure your mummy cookies turn out perfectly every time.
- Work Quickly with Chocolate: White chocolate, especially candy melts, tends to set quite fast. Have all your cookies and candy eyes ready and within reach before you start dipping. This ensures you can place the eyes before the chocolate hardens.
- Avoid Overheating White Chocolate: When melting white chocolate, whether in the microwave or over a double boiler, be cautious not to overheat it. Overheated chocolate can seize, becoming thick, grainy, and difficult to work with. Microwave in short bursts (15-30 seconds), stirring thoroughly between each interval, until just smooth.
- Achieving the Perfect Chocolate Consistency: If your melted white chocolate seems a bit too thick for dipping, you can easily thin it out. Add a tablespoon of shortening or 1 teaspoon of coconut oil to the chocolate while melting. Stir it in until you achieve a smooth, pourable consistency. This helps create a beautifully even coat on your cookies.
- Transform into Mummy Pops: For an even more fun party treat, turn these into Nutter Butter Mummy Pops! Simply insert a lollipop stick into the cream filling of each Nutter Butter cookie before dipping it in chocolate. This makes them easier to handle and eat, especially for little ones.
- Reheating Hardened Chocolate: If the chocolate in your bowl starts to harden while you’re working, don’t worry! Just pop it back into the microwave for another 15-second interval. Stir well, and it should return to its smooth, dippable state.
- Creative Drizzle Patterns: When it comes to the “bandages,” don’t be afraid to get creative! Zigzag patterns, diagonal lines, or even just random drizzles all contribute to a charming mummy look. Focus on avoiding the candy eyes to keep their spooky gaze clear.
Can I Use Oreo Cookies or Other Varieties Instead?
Yes, absolutely! While Nutter Butters offer a delightful peanut butter flavor and a perfect oval shape for mummies, this recipe is incredibly versatile. You can easily substitute them with other cookies like Oreo cookies (cream-filled or plain), shortbread, graham crackers, or even ginger snaps for a different flavor profile. The key is to choose a cookie that is sturdy enough to be dipped and has a flat surface to adhere the candy eyes.
Storage and Make-Ahead Tips
These delightful Nutter Butter Mummies are not only quick to make but also store beautifully, making them an excellent option for preparing ahead of your Halloween festivities. Once fully set, store them in an airtight container at room temperature for up to 5-7 days. If you want them to last longer or keep the chocolate extra firm, you can store them in the refrigerator for up to 2 weeks. For extended freshness, these cookies also freeze wonderfully for up to 1-2 months. Just ensure they are in a freezer-safe, airtight container, separated by parchment paper to prevent sticking. Thaw them at room temperature for about 15-20 minutes before serving.
More Spooktacular Halloween Recipes You Might Enjoy…
If you’re looking for more fun and festive ideas to complete your Halloween menu, check out these other popular recipes:
- Mummy Jalapeno Poppers: A savory twist on the mummy theme, perfect for appetizers.
- Classic Mummy Cookies: Another delightful mummy cookie recipe, often made with different bases like sugar cookies.
- Pumpkin Cookies: A soft and chewy autumn favorite, great for any fall gathering.
Nutter Butter Mummies Recipe Card
Rated 5 out of 5 stars from 1 vote.
Nutter Butter Mummies
Julie Maestre
10 mins
5 mins
15 mins
30
Rate Recipe
Print Recipe
Ingredients
- 16 ounces Nutter Butter cookies
- Two 10-ounce bags of white chocolate candy melts (or vanilla-flavored white chocolate)
- 1 package candy eyes
Instructions
-
Line two or three baking sheets with parchment paper and set them aside.
-
Add the white chocolate to a microwave-safe bowl and microwave for 30 seconds. Stir well. If it’s still not fully melted, microwave again in 15-second intervals, stirring after each, until smooth and creamy. Do not overheat.
-
Place the Nutter Butter cookies on a fork one at a time and dip completely into the melted chocolate. Gently tap the fork onto the edge of the bowl to remove any excess chocolate, ensuring a smooth, even coating.
-
Carefully transfer the dipped cookie to the prepared baking sheet, spacing them about 1-2 inches apart. Immediately add two candy eyes to each cookie before the chocolate sets. Work quickly!
-
If needed, microwave any leftover chocolate to ensure it’s smooth and pourable. You can also add more chocolate melts if you run low. Pour the melted chocolate into a piping bag and twist the top tightly.
-
Using scissors, snip just the tiniest bit off the tip of the piping bag. A very small opening is key to creating thin, realistic mummy bandages. Avoid cutting too much, as thick lines won’t look as delicate.
-
Hold the piping bag firmly and gently squeeze to drizzle the chocolate over the dipped cookies, creating zigzag or random lines that resemble mummy bandages. Be sure to go in multiple directions, carefully avoiding covering the candy eyes.
-
Allow the decorated Nutter Butter Mummies to set for at least 5 minutes at room temperature, or place them in the refrigerator for quicker setting. Once firm, they are ready to enjoy!
Notes
- The white chocolate sets pretty fast, so have all your ingredients ready and work quickly, especially when placing the candy eyes.
- When melting white chocolate, avoid overheating it, as this can cause the chocolate to seize and become dry or crumbly. Short, controlled microwave intervals are best.
- To achieve a smoother, thinner chocolate coating, feel free to add a tablespoon of shortening or 1 teaspoon of coconut oil to the melted chocolate.
- For an alternative serving idea, insert a lollipop stick into the cream filling of each Nutter Butter cookie before dipping to create fun Nutter Butter Mummy Pops.
- If your chocolate in the bowl begins to harden during the dipping process, simply pop it back into the microwave for 15 seconds, stir, and continue.
Nutrition
Carbohydrates: 10g |
Fat: 3g |
Saturated Fat: 1g |
Polyunsaturated Fat: 1g |
Monounsaturated Fat: 1g |
Sodium: 54mg |
Sugar: 4g
Nutrition information is automatically calculated, so should only be used as an approximation.
Additional Info
Julie Maestre
10 minutes
5 minutes
15 minutes
Dessert
American
30
70
Halloween Cookies, Mummy Cookies, Nutter Butter Mummies
We hope you enjoy making these super fun and easy Nutter Butter Mummies for your Halloween festivities! They’re truly a treat that brings smiles and a touch of spooky charm to any gathering. Don’t forget to share your experience!
Tried this recipe? Please leave a star rating in the recipe card below and/or a review in the comments section further down the page. And consider following me on Facebook, Instagram, or Pinterest!